


Backup your WordPress installation to Google Drive
Plesk login:
- Go to https://asiakassivut.tuonetti.fi/
- Log in with your account
- Go to Services by clicking on the "Services" box in the home screen or by clicking on the "Services" button in the top navigation bar.
- Select the web hosting service you want to edit
- Click on the "Login to Plesk Control Panel" button on the screen.
Enabling Google Drive Backup
- In the control panel, click on the "WordPress" menu in the left sidebar.
- Under the WordPress installation to be backed up, click on "Backup/Restore".
- On the new page, click the "Remote Backup Settings" button.
- Select "Google Drive Backup".
- Follow the instructions to log in to your Google account.
- Allow the "Plesk Backup" application to manage your Google Drive.
- When you reach the page titled "Confirm Sending Data". Click on the link below. You will be taken back to your web hosting settings.
- Under "Path" you can specify which Google Drive folder Plesk will back up your page to.
- Finally, click the "Apply" and "Ok" buttons.
Backup protection settings (optional, but recommended)
If you wish, you can encrypt your backup. Encryption helps prevent misuse of your backups, even if someone were to gain access to your Google Drive files.
- In the Remote Storage Mode settings, click the "Change" button under the "Backup Protection Settings" section.
- Enable protection and enter a strong password. For example, save the password in a password manager.
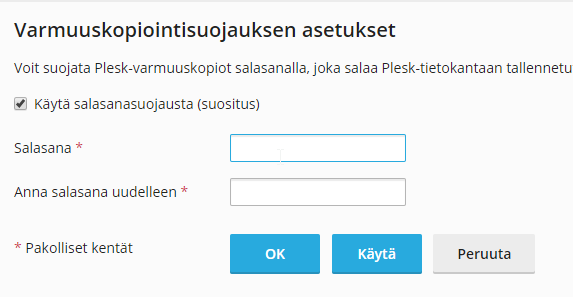
- Finally, press the 'Apply' and 'Ok' buttons.
Manual backup
- In the admin panel, click on the "WordPress" menu in the left sidebar.
- Under the WordPress installation to be backed up, click "Backup/Restore".
- Click on "Backup".
- Under "Save to Destination" select "Google Drive".
- Under "Type", select "Full" or "Growing". Full backup will copy everything and incremental will take into account the previous backup and save only the changed data. An incremental backup always backs up the entire database.
- Finally, click the "Ok" button.
- The backup will start in the background and you can monitor its progress on the "Manage Backup" page.
Scheduled backup
- In the admin panel, click on the "WordPress" menu in the left sidebar.
- Under the WordPress installation to be backed up, click "Backup/Restore".
- Click on "Schedule".
- Select: "Enable this backup feature."
- Select how often you want the backup to be taken.
- Use incremental backup as it saves space and server resources.
- Select the time when the full backup will be taken.
- Select "Google Drive" as the destination.
- Finally, press the "Apply" and "Ok" buttons.


