


Introduction:
This documentation will guide you through the process of removing a WordPress installation from a Plesk hosting panel. Plesk is a widely-used web hosting control panel designed to simplify the management of websites and servers. The steps below outline how to uninstall a WordPress site from your Plesk account.
Prerequisites:
- Access to a Plesk hosting panel with administrator privileges.
- An existing WordPress installation that you want to remove.
Step-by-Step Guide:
-
Log in to your Plesk hosting panel
Open your web browser and navigate to your Plesk login page. Enter your login credentials (username and password) and click on the "Log In" button to access your Plesk account.
-
Access the "Websites & Domains" section
Once logged in, click on the "Websites & Domains" tab in the left sidebar. This will display a list of all your hosted websites.
-
Locate your WordPress installation
Find the domain name associated with the WordPress installation you want to remove. Click on the domain name to expand its settings.
-
Open the "WordPress Toolkit" extension
In the expanded settings for the selected domain, locate and click on the "WordPress Toolkit" icon. This will open the WordPress Toolkit, which provides various tools and options to manage your WordPress installation.
-
Select your WordPress installation
In the WordPress Toolkit, you will see a list of all WordPress installations associated with your Plesk account. Locate the WordPress installation you want to remove and click on the checkbox next to it.
-
Uninstall the WordPress installation
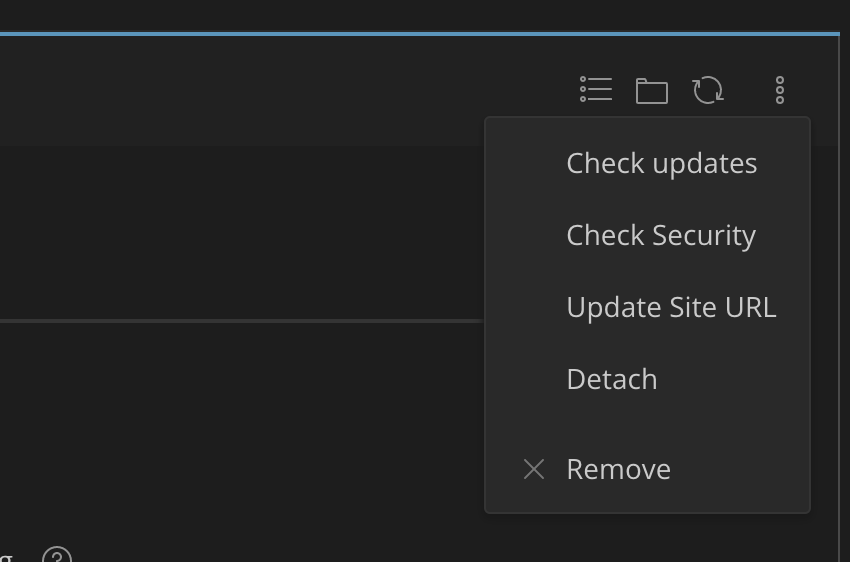
With the desired WordPress installation selected, click on the "Remove" button located at the top of the list. A confirmation dialog will appear, asking if you're sure you want to remove the selected WordPress installation.
If you want to delete the associated database and files as well, make sure to check the boxes for "Remove the database and database user" and "Remove the installation directory and all its files." Leaving these boxes unchecked will keep the database and files intact, allowing you to reuse them later.
Once you've made your selections, click on the "Yes, remove" button. Plesk will then uninstall the WordPress installation and delete the associated files and database (if selected).
-
Verify the removal
After the removal process is complete, you will be redirected back to the WordPress Toolkit. Verify that the WordPress installation you removed is no longer listed.
Conclusion:
You have successfully removed a WordPress installation from your Plesk hosting panel. If you need to reinstall WordPress or create a new website, you can use the WordPress Toolkit to set up a new installation. Remember to always create backups of your website and its data before making significant changes to ensure you can recover from any unexpected issues.


